If you’re running a class then it’s hard to find a better registration service than Event Espresso. It’s simple to set up and once you’re going it takes care of all of the work for you. That means less time on boring admin, and more time spent doing the things that you love!
There are loads of different types of classes that you can use Event Espresso for. For example,
- Dance classes
- Writing classes
- Yoga classes
- Singing classes
- Scrapbooking classes
- Cooking Classes
- IT classes
In fact, you can see some Event Espresso-powered sites in action:
- A Party for Your Palate
- Penningham House
- SOS First Aid
- The Tango Club
- Stephen Jeffreys’ Playwriting Masterclass
This tutorial will show you how to set up a one-off class. I’m going set up Event Espresso to run a class called “Cookery for Beginners.” However, you can follow the steps and replace with your own class’ details.
What Your Will Need:
- Event Espresso
- Course dates
- Venue information
- Course Cost
- Paypal information
You can read the installation and setup instructions to help you get started with Event Espresso.
Once you’re set up we’re ready to go.
1) Create a Venue
Before we actually create the event, we need to set up some options to make everything run smoothly. Navigate to Event Espresso > Venue Manager.

Add your venue’s details.

Click Save Venue.
2) Add PayPal information
I’m going to set this up to take payments via PayPal but you can use any gateway that you wish.
Navigate to Event Espresso > Payment Settings

Click on “Activate PayPal IPN”.

Now you can fill in your PayPal details. You should also choose the correct currency for your account.

If you want to test your setup you can check the PayPal sandbox settings. This will let you run through your signup process without having to actually pay for anything.
3) Create Questions
Every class is going to have different questions that need to be answered. For example, for my cookery class I have some specific information that I need to capture:
- Does the attendee have any food allergies or dietary requirements?
- Does the attendee require any assistance or special access?
- We need to create these questions. Then we can group them together and attach a whole group to an event.
Navigate to Event Espresso > Questions

Click “Add New Question”.

Complete the form. You can choose different types of form fields for your attendees to fill in. You could use a dropdown for a multiple choice question, or a check box for a question that just requires a yes/no answer.

You can also make a question required so that the attendee is forced to answer it.
Here are my questions

4) Create Question Group
Question groups are groups of questions that you can assign to different events. This grouping method means that you can assign a whole group of questions to an event. Event Espresso comes with two preset question groups:
- Personal information
- Address Information
These groups will capture the essential information that you need but you can create specialised groups of questions that are tailored to your course.
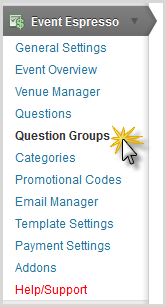
Navigate to Event Espresso > Question Groups

Click on “Add New Group.”

Give your group a name and select the questions that you want to add. You can also decide whether you want the group name and description to appear on the homepage.

When you’re happy with the settings click “Add Group.”
5) Create Your Event
Now you’re ready to create your event! Navigate to Event Espresso > Event Overview.
Click “Add New Event.”

You’ll see what looks likes the WordPress post and page editing screen, but with lots of extra bits. This is the main event creation page for Event Espresso. It’s where you’ll come back to again and again for all of the amazing events you’ll be creating!
To start with add a name and a description for your event. This will appear on the event page on the front end.

Now let’s take a look at the event options. You’ll find this box on the right hand side under the Publish button.
There are a number of different settings that you can adjust here:
- Decide how many attendees to have at your event
- Allow group registrations and decide how big that group can be
- Require additional information for events
And then you have some advanced settings which you can use to further tweak your event. For example, you can:
- Choose whether to display your event description
- Choose whether to display the registration form
- Use an alternate registration page
- Use an alternate email address
Because my cookery class requires a kitchen classroom I need to limit the numbers to 15 so that everyone gets a workspace. Also, I do not want to allow group registrations.
Here are my settings:

Event Date / Times
Scroll down to Event Date / Times
Here you can add the practical details of your event. Obviously the most important thing that you need to enter is the date and time. However, you can also set the date and time that registration opens. This helps you control when people can sign up. For my cookery class, for example, I want registration to close a week before the class. This gives me time to buy all of the ingredients!

Event Pricing
You can add as many different prices to your event as you want. This means you can have special rates for students, retirees, children, just about anyone you want. For my event I want a flat rate of $60, but I’ll also add a rate of $40 for the over 60s.

Event Question for Primary Attendee
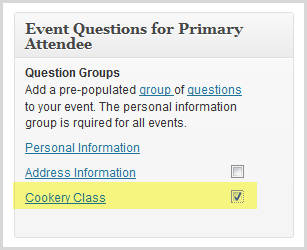
Here’s where you can attach your question groups. Everyone has to fill in their personal information – first name, last name, email address. You can add to those groups or create your own groups. I’m going to attach the group we just created.

Additional Event / Venue Information
Now you get to select the venue that you’ve already created. Choose it from the dropdown menu.

That’s everything that we need to add for this class. However, for your class you can also change the following settings:
- Add a custom email confirmation
- Create a post for the event
- Add discount codes
- Put your event in a category
When you’re happy with your settings click “Submit New Event”.
Your course is now ready to go!
It will appear on your registration page but if you want you can insert a shortcode into a specific page. To find the shortcode navigate to Event Espresso > Event Overview.
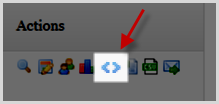
You’ll see some action icons beside your event. The shortcode one looks like two blue point brackets:

You can copy this shortcode onto any page except your main event registration page.
Check out my sign-up form for my cookery class in action:
