If you have followed this Getting Started guide from the start you will now have the basic information for your event prepared.
This means you can now create your event!
Start by going to Event Espresso > Event Overview and then click Add New Event.
There are a lot of options here, and we won’t cover them all in this little guide, so feel free to check out the full Event Espresso documentation at your leisure.
The Basics
Start by adding an Event Title and Event Description. Don’t worry about the Unique Event Identifier, the system will add this in for you.
Event Date/Times
It is quite important that you get these right otherwise it can affect how the events work.
Registration Dates: These are for when you will allow a user to register for the event. Please make sure that both of these are filled in, Even Espresso does not allow open-ended events.
Registration Times: Similarly add the times registration is allowed each day. Not required.
Event Dates: What dates your event will run from and too. Required.
Event Times: The times your event is on each day. You can add additional times if the event is repeated within a day.
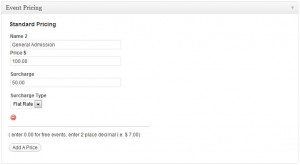
Event Pricing
Here you can add the all important Price, and start making money from your events! You can add as many pricing options as you like here, they will be displayed in a drop down box on the registration page allowing users to select the correct one.
If you have the Membership add on, you will also see a membership pricing option. Be sure to fill this out as well unless you want members to get free tickets!
Name: The display name for the price/ticket type
Price: formatted like so 10.00
Surcharge: This is for additional costs like Tax, fuel costs, etc. It is optional.
Surcharge Type: Flat rate means the figure you entered will be charged, Percent means that the figure you entered will be converted into a percentage and tacked on top of the ticket price.
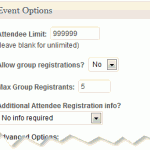
Event Options
Attendee limit: cap how many people can attend, leave blank for unlimited.
Allow group registrations?: This means that one person can buy tickets for a group.
Max group registrations: You can cap how many tickets someone can buy in one go.
Additional Attendee Registration Info?: Do you need to collect question information from everyone in a group or just the buyer? If you need information from each attendee, you can select either “Personal information only” or “Full registration information”. These options will make the registration form display a dropdown of additional questions for each attendee added.

If you need information from only one attendee you can select “No info required”. If you select this option it will display a quantity ticket selector below the registration form.

Did you create a venue?
If so scroll down and under Venue Information select the venue you created from the drop down list.
Did you create some new questions?
If so scroll down and on the right is Event Questions for Primary Attendee and Event Questions for Additional Attendees (this one is used if you allow group registrations). Tick the box next to the question groups you want to use.

Submit New Event
In the top right of the screen is a shiny blue button called Submit New Event, click it and your event will be created!

We havent covered every option available to you in this guide, but full documentation is available here.

