Event Espresso version 3 Documentation for the Payment Settings
The Payment Settings options page has all the settings for every payment gateway that Event Espresso supports.
Payment gateways are split into two broad categories: onsite and offsite. Onsite gateways allow users to pay with their credit card without leaving your website. Offsite gateways, send the user to the payment gateway site to complete the transaction.
You will at first be faced with a lots of grey bars, with the payment gateway names on them. Clicking one will open it to show a green activation button. Click that and the gateway will become active and you will then need to add the appropriate details for the gateway.
The list below links to each payment gateways documentation where you can find set up instructions, troubleshooting and usage tips.
[s2If current_user_can(access_s2member_level2)]
[/s2If]
[s2If current_user_can(access_s2member_level2)]
AliPay, First Data Connect 2, WorldPay: Are no longer supported.
2Checkout
Back to top
Authorize.net AIM
- Authorize.net AIM Login ID: Your Authorize.net AIM login ID
- Authorize.net AIM Transaction Key: This can be obtained from your Authorize.net account.
- Account uses Authorize.net development server: Allows you to purchase events using fake credentials in order to test the payment system.
- Submit a test transaction: Check this if you are using the development server and wish the test the transactions.
- Force HTTPS on Return URL: Forces the gateway provider to send the customer back to the return page — or pull the return page from the site — using HTTPS. This is required in some instances to prevent a warning that the page the user is going to is not secure.
- Display a form header: Tick this if you wish to see a header above the payment form.
- Header Text: This is the text that will be displayed if the above option is ticked.
Back to top
ANZ
- Merchant ID: Available from your ANZ account.
- Access Code: Available from your ANZ account.
- Secure Secret: Available from your ANZ account.
- Bypass Payment Overview Page: If this is set as Yes, instead of the user having to select the payment gateway button it will redirect the user to the gateway directly.
- Force HTTPS on Return URL: Forces the gateway provider to send the customer back to the return page — or pull the return page from the site — using HTTPS. This is required in some instances to prevent a warning that the page the user is going to is not secure.
- Button Image URL: This contains the default image supplied by Event Espresso. If you wish to use a different button, change the url here.
- Current Button Image: A visual representation of the current button.
Note:
If you want to test your account, use the test credentials (the test Merchant ID always starts with the characters ‘TEST’. e.g., if your normal account has a Merchant ID of ‘ANZKANGAROO’, your test merchant ID should be ‘TESTANZKANGAROO’.)
Also, ANZ will provide you wish two Secure Secrets. You may use either one.
Back to top
Back to top
ATOS
- Notes on Files and Permissions: In order for the Atos gateway to work properly, you will need to upload the files given to you by your provider to the folder matching your selected provider above. Eg, gateways/atos/mercanet/. The file called pathfile will need to be writable by your web server and the two files in gateways/atos/bin/ will need to be executable by your web server. The current implementation uses the Atos provided Linux executables. Please contact support if you are using a Windows server, and would like to sponsor development of a version that will run on your server. For more information on setting file permissions, see: http://codex.wordpress.org/Changing_File_Permissions
Back to top
Authorize.net SIM
Back to top
Electronic Funds Transfer
- Title: The title to display for the payment gateway.
- Payment Instructions: Specific instructions on how to initiate the payment or terms.
- Name On Account: The name on Your account
- Bank Account #: Your account number
- Bank Name: Your bank name
- Bank Address: Your bank address
Back to top
Beanstream
- Beanstream Merchant ID: Available from your Beanstream account.
- Use Beanstream in Sandbox mode?: Allows you to purchase events using fake credentials in order to test the payment system.
- Force HTTPS on Return URL: Forces the gateway provider to send the customer back to the return page — or pull the return page from the site — using HTTPS. This is required in some instances to prevent a warning that the page the user is going to is not secure.
- Display a form header: Tick this if you wish to see a header above the payment form.
- Header Text: This is the text that will be displayed if the above option is ticked.
Back to top
Check(Cheque)/Money Order
- Title: The title to display for the payment gateway.
- Payment Instructions: Specific instructions on how to initiate the payment or terms.
- Payable To: Who the check(cheque) should be made payable to.
- Address to send Payment: Default is the address set in the Organization Settings section of the General Settings page. Change it here to override this.
Back to top
Eway
Back to top
Eway Rapid 3.0
- Eway Rapid 3.0 API Key: Available from your Eway account.
- Eway Rapid 3.0 API username: Available from your Eway account.
- Eway Rapid 3.0 API password: Available from your Eway account.
- Choose your region: Choose the correct location for your business.
- The currency set for your region is: This will auto update when you select the Region and update the settings.
- Use Eway Rapid 3.0 in Sandbox Mode: Use this for testing transactions. Remember to turn it off before accepting live transactions.
- Force HTTPS on Return URL: Forces the gateway provider to send the customer back to the return page — or pull the return page from the site — using HTTPS. This is required in some instances to prevent a warning that the page the user is going to is not secure.
- Display a form header: Tick this if you wish to see a header above the payment form.
- Header Text: This is the text that will be displayed if the above option is ticked.
Back to top
E-xact
Back to top
First Data
Back to top
First Data E4
Back to top
Google Wallet
Google Wallet Settings Instructions
Setup your Google Wallet merchant acccount here.
You will find your ‘Merchant ID’ and ‘Merchant Key’ in Google Wallet’s management area, by clicking “Settings”, then “Integration”. You must enter them into Event Espresso’s ‘Google Wallet (Checkout) payment settings.
On the Google Wallet (Checkout) Settings Integration page, set the ‘API callback URL’ in Google Checkout to the following:http://ee-3133-fresh.dev?type=google_checkout (a page on your website with an added GET query parameter of ‘type=google_checkout’). Leave the “Callback Contents” as “Notification Serial Number”.
Set the API version to 2.5, and check the box under “Notiication Filtering” stating ” I am integrating using the Order Processing Tutorial documentation and will receive and handle only the following notifications: new-order-notification, authorization-amount-notification, order-state-change-notification.”.
Lastly, don’t forget to save your settings in both Google Wallet (Checkout) AND Event Espresso’s payment settings page.
- Google Merchant ID: Available from your Google Wallet account.
- Google Merchant Key: Available from your Google Wallet account.
- Select the currency for your region: Select your currency from the available options.
- Use the Debugging Feature and Google Wallet Sandbox: This will enable you to make test transactions. Remember to turn it off before accepting real transactions.
- Force HTTPS on Return URL: Forces the gateway provider to send the customer back to the return page — or pull the return page from the site — using HTTPS. This is required in some instances to prevent a warning that the page the user is going to is not secure.
- Default Payment Status on Receipt of ‘New Order Notification’: Google does not confirm the payment has been accepted straight away, on average it takes 15 minutes but can be quicker or take longer. This option sets what you show to the customer after they have completed the transaction. By default it is the more technically correct Pending, but this may confuse customers. Setting it to Complete may reduce queries, but if there payment is rejected you may need to explain why it was marked as complete.
Back to top
iDEAL by Mollie
- Mollie Partner ID: Available from your Mollie account.
- Use iDEAL in test mode: Selecting this will mean only test transactions go through, live transactions will not occur. YOu need to make sure that test mode is enabled in your Mollie account as well.
- Force HTTPS on Return URL: Forces the gateway provider to send the customer back to the return page — or pull the return page from the site — using HTTPS. This is required in some instances to prevent a warning that the page the user is going to is not secure.
Back to top
Invoices
- Title: The title to display for the payment gateway.
- Invoice Instructions: Specific instructions on how to initiate the payment or terms.
- Payable To: Who the invoice should be made payable to.
- Address to send Payment: Default is the address set in the Organization Settings section of the General Settings page. Change it here to override this.
- PDF Settings
- PDF Title (top right of the invoice): allows you to change the title in the PDF file.
- Logo URL: Add an image url to insert a logo into the PDF.
- Invoice instructions on the PDF: Specific instructions on how to initiate the payment or terms.
- Show as option on the payment page: Default is Yes. If turned to No it will hide the invoice option from the payment page.
Troubleshooting Invoices
I am getting an error and tickets won’t download – If the error mentions a missing or incorrect image file such as “FPDF error: Missing or incorrect image file: http://www.yoursite.com/wp-content/uploads/espresso/ticketing/ticket-bg.jpg”, it is likely due to an incorrect server setting. You can either try amending your PHP.INI file or contacting your host to see and/or enable the “allow_url_fopen” option. You can also check if this is enabled or not by using a plugin such as WordPress phpinfo().
Back to top
Luottokunta
Luottokunta MAC Security Check
Using MAC calculation (MAC = Message Authentication Code) improves the security of the card payments in online store. Use of the MAC calculation is mandatory and the merchant must implement the MAC calculation in two phases in the HTML form interface. If the merchant does not use MAC calculation, the merchant will be responsible for any security risks and damages experienced by Luottokunta.
Luottokunta sends the merchant one secret key for the MAC calculation, enclosed in the service ID codes letter for Luottokunta ePayment Service, and this key is used for actual MAC calculation.
To Activate the Mac Security Check:
Log in to Transaction management section of the web interface of Luottokunta ePayment Service, using a merchant admin user or admin user ID.
Go to the page “Merchant settings”.
Enable the options “Add MAC check to HTML form” and “Add MAC check to Success_Url” (by marking them as checked).
Save your changes by clicking the button “Update”
Lastly, from within Event Espresso’s payments page, set “Perform MAC security Check” to “Yes” and click “Update Luottokunta Settings”
Back to top
Megasoft
- Affiliation ID: This is available from your Megasoft account.
- Button Image URL: This contains the default image supplied by Event Espresso. If you wish to use a different button, change the url here.
- Current Button Image: A visual representation of the current button.
- Account Uses Megasoft’s development Server: Allows you to send test transactions.
- Display a form header: Tick this if you wish to see a header above the payment form.
- Header Text: This is the text that will be displayed if the above option is ticked.
Back to top
Merchant Warrior
Back to top
Moneris
The Moneris gateway requires some setting up in both the Event Espresso settings and your Moneris account before it can fully integrate with Event Espresso.
Moneris Hosted Paypage Configuration
Log into your Moneris account and navigate to the main Hosted Paypage Configuration page by clicking your configuration or after creating a new configuration.
Under Basic Configuration>Response Method you select Response Method: Sent to your server as a POST. You set the Approval and Declined URLS to the URL that’s the Event Espresso Thank You page. Then Save changes.

Next step: Configure Response Fields.
Then click on the Configure Security button. You check the boxes next to the following items:
- Return line item details.
- Return billing details.
- Return other customer fields. (cust_id, client_email, note . . .)
- Return ECI value.
- Return the txn_number. This field is used to perform follow-ons.
- Automatically prompt cardholder for new card number on decline.

Next Step: Configure Security. On the Security Features page under Referring URL, add full URLs pointing to the home page URL and for the main EE pages: registrations, transactions, thank-you. The cancellation page does not need to be added.
Add each one individually and click the Add URL button after adding the link to the input field.
In the Transaction Verification section, make sure that the Enable Transaction Verification checkbox is selected and then select Displayed as XML on our server from the list of available Response Methods.
After that, enter the full URL for the EE transactions page in the Response URL text input.
Finally click on the Save Verification Settings button.

Event Espresso account settings
- Moneris Hosted Pay Page Store ID (ps_store_id): Please see your Moneris account for this information.
- Moneris Hosted Pay Page Key (hpp_key): Please see your Moneris account for this information.
- Transaction Mode: Has three settings; Development – uses the Moneris testing servers to test payments; Dev + Debug – similar to Development but outputs data onto the website for easier debugging; Production – this is to be used if your site is live and taking real payments.
- Moneris Canada or USA?: Set your country preference.
- Language: Set your language preference between English and French. English is default.
- Invoice Notes: Here you can add a default note that will appear on invoices.
- Button Image URL: Use a custom button for Moneris on your Event Espresso payment page.
Back to top
NAB Transact Direct
- NAB Merchant ID: This is available from your NAB account
- NAB Merchant Password: This is available from your NAB account
- Use NAB Transact Direct post in test mode?: This turns on the test mode to allow test transactions.
Back to top
Paychoice
- PayChoice Username: This is available from your PayChoice account.
- PayChoice Password: This is available from your PayChoice account.
- PayChoice Currency Symbol: PayChoice currently only accepts AUD.
- Use the Test Mode for PayChoice: Allows you to send test transactions.
- Force HTTPS on Return URL: Forces the gateway provider to send the customer back to the return page — or pull the return page from the site — using HTTPS. This is required in some instances to prevent a warning that the page the user is going to is not secure.
- Display a form header: Tick this if you wish to see a header above the payment form.
- Header Text: This is the text that will be displayed if the above option is ticked.
Back to top
[/s2If]
PayPal Standard
Using PayPal Sandbox
The PayPal Sandbox is a method of testing payments for PayPal without actually having to pay something. PayPal’s sandbox documentation can be found here.
Setting up the PayPal IPN
We have a guide to help you set up your IPN (Instant Payment Notification) with PayPal. This can be found here.
Troubleshooting PayPal
Users cannot pay by credit card – This is a PayPal setting, check this handy image to find the correct setting.
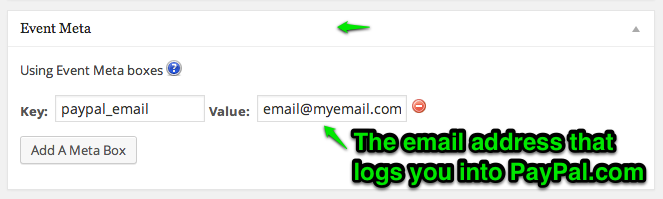
Per-Event Settings
By setting fields in the Event Meta section of the event editor, you can override the global paypal settings, and direct revenue from an event to a separate account. This feature will not work with the Multiple Event Registration add-on registration process, however. The override fields are:
Back to top
[s2If current_user_can(access_s2member_level2)]
Paypal Payments Pro
An SSL certificate is required to use PayPal Pro.
- PayPal Payments Pro Email: The email you use for PayPal
- PayPal API username: Available from your PayPal Pro account.
- PayPal API Password: Available from your PayPal Pro account.
- PayPal API Signature: Available from your PayPal Pro account.
- Select the currency for your country: Choose the appropriate currency. This is not set by Event Espresso.
- Accepted Credit Cards: Tick the boxes for the credit cards you wish to accept.
- Use PayPal Payments Pro in Sandbox Mode: Allows you to send test transactions.
- Force HTTPS on Return URL: Forces the gateway provider to send the customer back to the return page — or pull the return page from the site — using HTTPS. This is required in some instances to prevent a warning that the page the user is going to is not secure.
- Display a form header: Tick this if you wish to see a header above the payment form.
- Header Text: This is the text that will be displayed if the above option is ticked.
Back to top
PayTrace
- PayTrace User ID: Available from your PayTrace account.
- PayTrace User Password: Available from your PayTrace account.
- Force HTTPS on Return URL: Forces the gateway provider to send the customer back to the return page — or pull the return page from the site — using HTTPS. This is required in some instances to prevent a warning that the page the user is going to is not secure.
- Display a form header: Tick this if you wish to see a header above the payment form.
- Header Text: This is the text that will be displayed if the above option is ticked.
Back to top
PsiGate
Why is there a Canadian and US PSiGate Store Key?
If you will be accepting payments only in USD, you only need to enter a “US PSiGate Store Key”. Conversely, if you are only accepting payments in CAD, you need only enter a “Canadian PsiGate Store Key”.
If, however, some events will be accepting US dollars and others will be accepting Canadian dollars, you will need 2 PSiGate accounts: one accepting CAD and the other for USD. Enter the store keys for each into Event Espresso in the appropriate fields (“Canadian PSiGate Store Key” and “US PSiGate Store Key”).
Then, select a default currency. You may then specify an event as using the other currency by adding an ‘Event Meta’ called ‘event_currency’, and give it a value of either ‘USD’ or ‘CAD’.
When customers go to pay for an event, if the currency is in USD, your US Store Key will be used. If the currency for the event is CAD, the Canadian Store Key will be used.
Back to top
Purchase Order
- Title: The title to display for the payment gateway.
- Payment Instructions: Specific instructions on how to initiate the payment or terms.
- Payable To: Who the invoice should be made payable to.
- Address to send Payment: Default is the address set in the Organization Settings section of the General Settings page. Change it here to override this.
The Purchase order number will show on the attendee overview page.
Back to top
Quick Books
- QuickBooks Connection Ticket: Available from your Quick Books account.
- Use PTC (Development) Server: Use the test server to put through fake transactions. Remember to turn this off before allowing live transactions.
- Display a form header: Tick this if you wish to see a header above the payment form.
- Header Text: This is the text that will be displayed if the above option is ticked.
The Purchase order number will show on the attendee overview page.
How to Configure QuickBooks Merchant Services Payment Gateway
- First signup for a Merchant Services Account here
- After creating the account, click here to link Event Espresso to your QuickBooks Merchant Services account
- After you click on the previous link, enter your QuickBooks Merchant Services email and password.
- You will then be given a ‘Connection Ticket’, which you must copy and paste into the Field ‘Connection Ticket’ in Event Espresso’s QuickBooks Merchant Services payment settings field.
(Note: if you change whether you’re using the PTC/Development server, you will need to re-acquire your connection ticket.)
- All done! Now just test that payments are working, and you’re done!
Back to top
QuickPay
- QuickPay ID: Available from your QuickPay account.
- QuickPay MD5 Secret: Available from your QuickPay account.
- Payment Window Language: Choose a language which the payment screen will be displayed in.
- Automatic Capture: Automatic Capture skips the bank authorization process and obtains the money directly. http://quickpay.net/features/autocapture/
- Currency: Choose a currency for payments.
- Turn on debugging using the Sandbox: Allows you to send test transactions.
- Force HTTPS on Return URL: Forces the gateway provider to send the customer back to the return page — or pull the return page from the site — using HTTPS. This is required in some instances to prevent a warning that the page the user is going to is not secure.
- Button Image URL: This contains the default image supplied by Event Espresso. If you wish to use a different button, change the url here.
- Current Button Image: A visual representation of the current button.
Back to top
RealAuth
In addition to adding the Merchant ID and Shared secret, you will need to contact Realex support and give them a response URL (which is the page on your site with the [ESPRESSO_TXN_PAGE] shortcode. By default, it’s the page set as the notify URL in the Event Espresso>General Settings.
I recommend this documentation for additional info, there is a check-list on page 5 that may help you get up and running:
https://resourcecentre.realexpayments.com/documents/pdf.html?id=141
Back to top
Stripe
- Stripe Secret Key: Available from your Stripe account.
- Stripe Publishable Key: Available from your Stripe account.
- Stripe Currency Symbol (USD): Defaults to USD, but as Stripe expands other currencies may become available.
- Force HTTPS on Return URL: Forces the gateway provider to send the customer back to the return page — or pull the return page from the site — using HTTPS. This is required in some instances to prevent a warning that the page the user is going to is not secure.
- Display a form header: Tick this if you wish to see a header above the payment form.
- Header Text: This is the text that will be displayed if the above option is ticked.
Back to top
USAePay Offsite
- Key: Available from your USAePay account.
- Button Image URL: This contains the default image supplied by Event Espresso. If you wish to use a different button, change the url here.
Back to top
USAePay Onsite
- Key: Available from your USAePay account.
- Use USAePay Development Server?: Use the test server to enable you to create fake transactions whilst tesrting your site. Make sure you obtain and use the Development Key rather than your own Key.
- Submit a test transaction: Tick to enable fake transactions.
- Force HTTPS on Return URL: Forces the gateway provider to send the customer back to the return page — or pull the return page from the site — using HTTPS. This is required in some instances to prevent a warning that the page the user is going to is not secure.
- Display a form header: Tick this if you wish to see a header above the payment form.
- Header Text: This is the text that will be displayed if the above option is ticked.
Back to top
WePay
Back to top
WorldPay
- WorldPay Installation ID: Available from your WorldPay account.
- Button Image URL: This contains the default image supplied by Event Espresso. If you wish to use a different button, change the url here.
- Image URL: This contains the default image supplied by Event Espresso. If you wish to use a different button, change the url here.
- Select the currency for your country: Choose the appropriate currency. This is not set by Event Espresso.
- Relay Response URL: This shows the specific the URL to which the gateway should return the relay response for a transaction. This the page should be set in your Authorize.net account. Login to Authorize.net, goto Account > Response/Receipt URLs > Add URL and enter the following URL: Relay Response URL: http://www.ee3128.3.dev/?page_id=5
This URL can be changed in the “Organization Settings” page, by changing the Notify URL page option.
- Bypass Payment Overview Page: If this is set as Yes, instead of the user having to select the payment gateway button it will redirect the user to the gateway directly.
ImportantThis should only be used when you have one payment gateway, which also must be an offsite gateway like PayPal. It is also highly recommended that you turn off the payment return option to avoid the user being looped back to the gateway if the payment fails.
- Turn on Debugging Using the WorldPay Sandbox?: Turns on the test mode, no real transactions can be made whilst this setting is on.
- Force HTTPS on Return URL: Forces the gateway provider to send the customer back to the return page — or pull the return page from the site — using HTTPS. This is required in some instances to prevent a warning that the page the user is going to is not secure.
- Current Button Image: A visual representation of the current button.
Event Espresso version 4 Documentation for the Payment Settings (In Progress)
This section allows you to set which forms of payments will be displayed to a user if the event has a price other than zero.
Payment Methods
This tab shows the core payment gateways and there settings.
Clicking one of the gateways listed at the top shows the individual gateways activation option, and then the settings.
A gateway must be activated before it can be used. A grey cog icon means the gateway is not active, a green coloured cog means the gateway is active.
Settings
This tab controls site wide gateway settings that span across different gateways.
Allow Payment-retry for Pending and Deferred Payments
If a payment is marked as ‘Pending Payment’, or if payment is deferred (ie, an offline gateway like Check, Bank, or Invoice is used), then give registrants the option to retry payment.
[/s2If]


